
Project Objective
For our final project, we aimed to develop a Wii-inspired gaming console powered by a Raspberry Pi. While we initially focused on recreating tennis from Wii Sports, the project rapidly evolved into a complete emulation of the classic system, incorporating Bluetooth-connected “Wii remotes”, a Pygame-based home screen, and individual “Wii channels” to explore. We successfully combined concepts from this course and beyond to deliver an interactive, low-cost gaming platform that mimics the core experience of the original Nintendo Wii.
Raspberry Pi Wii Demo Video
Introduction
In our project, we were able to create a gaming console hosted on Raspberry Pi devices with all the basic functionality of Nintendo’s Wii. Our system features a main console and two Wii remotes with cursor pointing capabilities, motion tracking technology, and Bluetooth communication. The console is composed of a Raspberry Pi 4 and two green LEDs acting as the sensor bar. The remotes each have an IMU fusion sensor attached, and the Player One remote contains a camera mounted to the head of the remote, as well as 2 buttons on the back. On the software side, we re-created a functional and accurate Wii main menu, Wii Sports, and Mii Channel through Pygame. For our main game, Wii Sports, we created our own versions of Wii Tennis and Wii Archery. Our Wii Tennis utilizes the absolute orientation and angular velocity to achieve one-to-one correspondence between your Wii Remote and in-game tennis racket. Our main menu, Wii Archery, and Mii Channel all use our Wiimote pointer tracking to achieve seamless gameplay similar to a real Wii. The main menu is also completely interactive and utilizes the subprocess module to play video clips for each channel.

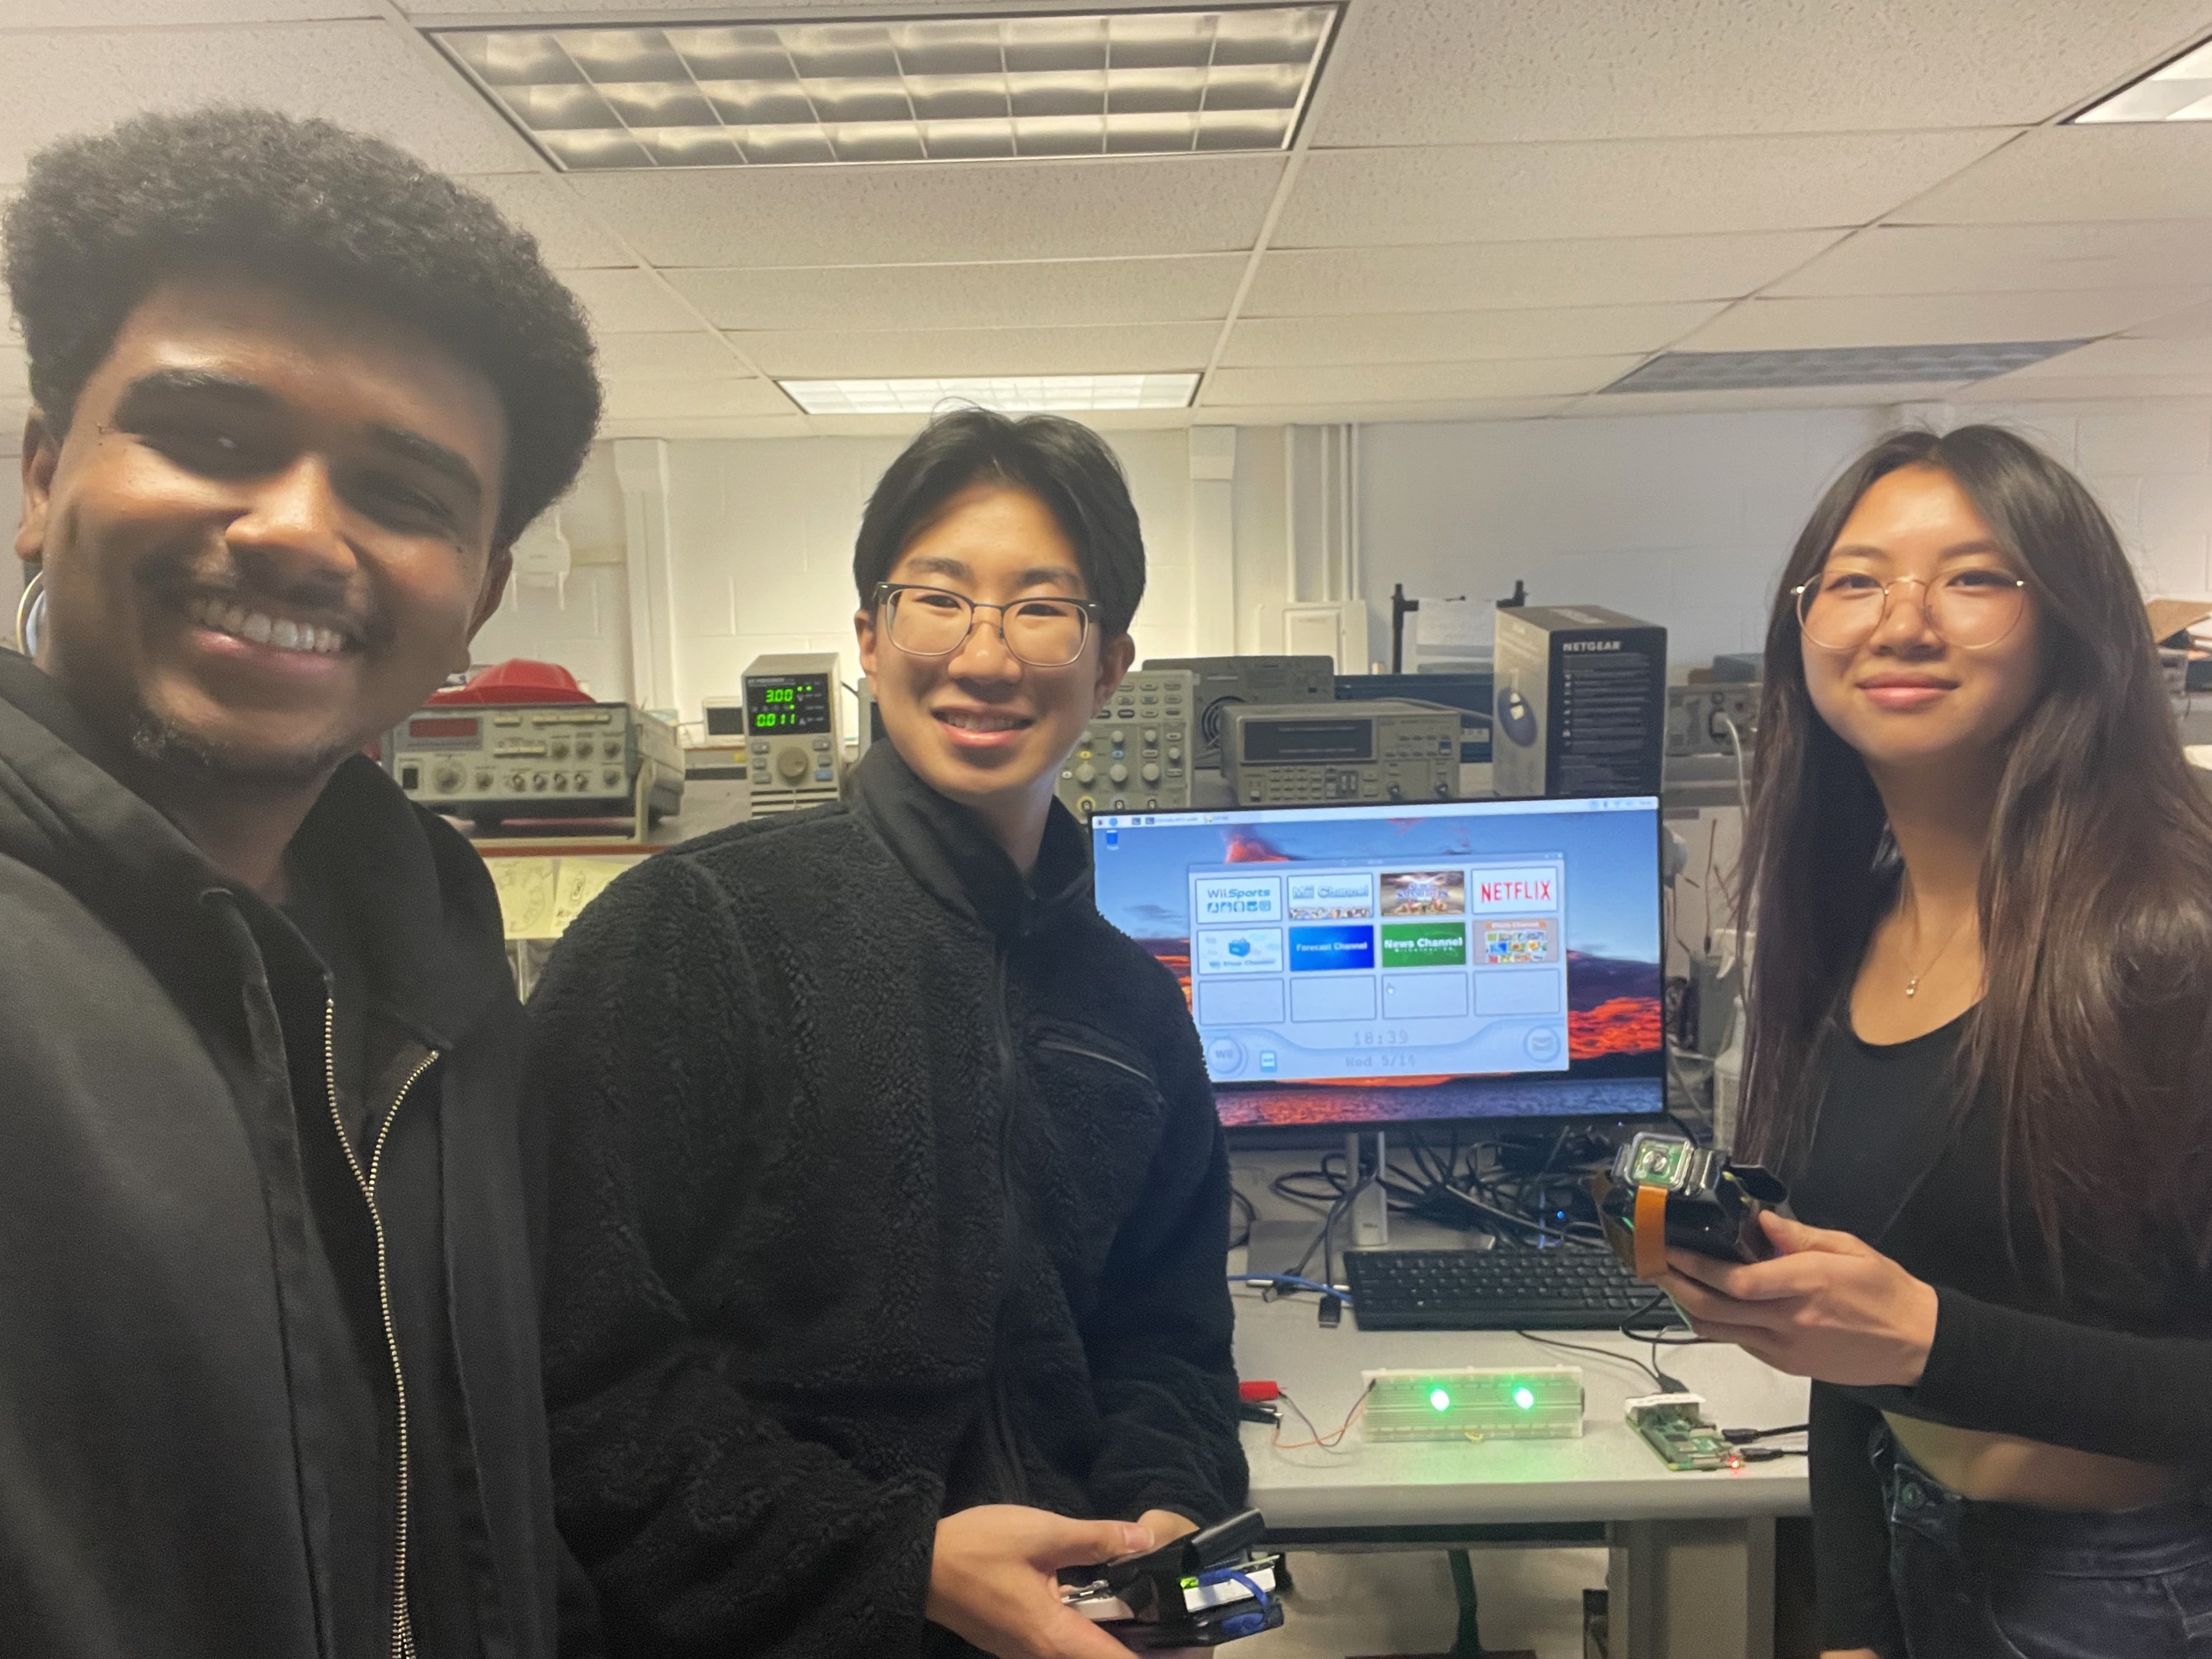
Complete setup of the Raspberry Pi Wii system
Design and Testing
The final version of our Wii Remote uses a Raspberry Pi Zero 2 W,
the Adafruit BNO055 9-DOF Absolute Orientation IMU Fusion Breakout, the Raspberry Pi Camera v2.1, and two
buttons.
Bluetooth
The Wii Remote communicates with our Pi 4 console over Bluetooth to send IMU readings and cursor positioning. We experienced several issues with Bluetooth communication since Bluetooth acts as a stream rather than individual messages in a queue. Each time the console “reads” a message, it is actually reading 1024 bytes from the stream, which can contain multiple messages. The first issue that arose was if the remote sent 2 messages faster than the console read them, resulting in a message with more fields than expected. This was resolved by adding an end-of-message character (“\n”) to delimit separate messages. The second issue occurred when we stopped processing messages during cut scenes, the stream would fill with over 1024 bytes with messages sent by the remote. Once the console reads the stream, it would cut a message somewhere and create corrupt messages that could not be processed. To fix this, we added an additional start-of-message character (“*”), so now the console looks for both a start and end character, and discards everything else.

Remotes, console, and sensor bar that make up the RPi Wii
Another issue occurred when we attempted to add the Player Two remote. Both remotes sent data on the same RFCOMM
channel, but there was no way to time the Player Two remote’s connection properly. The channel had to be
initialized to listen for 2 connections, but even if we didn't “accept” Player Two’s connection yet, it could
still join the channel and begin sending messages. We would have to flush out the stream once tennis was
started,
and we actually needed Player Two’s inputs, but this required non-blocking calls for reading from the stream.
This
was ultimately resolved by moving Player Two to a new channel and separate socket that would be initialized at
the
start of Tennis only, and closed once Tennis was shut down. Player Two’s code was modified to run on a permanent
loop that closed its client socket as well, before reinitializing and waiting to connect again.
Bluetooth functionality was tested by verifying the messages sent by the controllers with the messages received
by
the console. In addition, we slept the Pis on each controller so that there would be a buildup of messages in
the
console’s queue. We then outputted the results of our parsing algorithm to ensure that the invalid messages were
dropped and the correct messages were received.
Inertial Measurement Unit (IMU)
For our IMU, we went through several design stages to achieve the one-to-one correspondence between the Wii
Remote
and the in-game racket for Wii Tennis. The first version of our Wii Remote utilized the Adafruit LIS3DH
Triple-Axis Accelerometer instead of the BNO055 IMU. With the LIS3DH, the movement of the racket corresponded to
an acceleration above a certain threshold on the x-axis. However, the racket was limited to 3 positions (right,
left, center) and the Wii Remote had to be held exactly parallel to the ground for accurate tracking due to the
effect of gravity on the accelerometer readings. Additionally, the in-game racket could become desynchronized
with
the remote if the movement was too slow or if it occurred during a delay. After some research, we came up with
the
idea to add a gyroscope to give the game a more seamless feel. The BNO055 IMU was the perfect substitute, as it
gave an absolute orientation and angular velocity vector. The absolute orientation vector gives 3 angles
corresponding to the roll, pitch, and yaw of the remote, which were used to determine where the player is
holding
their racket. The angular velocity is then used to change the ball's speed depending on how fast the player
swings
their racket. Overall, this allowed the game to be much more accurate, and the BNO055’s readings were far more
helpful than the LIS3DH’s accelerometer readings.

Close up of the IMU on the Wii Remote
Testing involved checking the output values of the sensors with the player’s virtual and physical movements. For
example, we validated the accelerometer against the direction of gravity and confirmed that wrap-around motion
had
no impact on the IMU’s accuracy. Such data was used to calibrate the range of values to register as player input
and to drop noisy movements.
Camera Pointer Tracking
For the cursor tracking, we also went through several design stages before arriving at the final setup we have
now. We wanted to emulate Nintendo’s tracking, which utilizes an infrared camera on the top of the remote and 2
infrared lights for the sensor bar. We only had access to a camera, and we initially planned on mounting the
camera to our console and using CV to track the player’s remote. However, for this version, the gameplay would
be
significantly different than how a real Wii Remote feels, since you would need to directly move the remote to
where you wanted the cursor on the screen. We ultimately scrapped this version and decided to mount the camera
onto our Wii Remote instead to track 2 LEDs that would act as our “sensor bar”.

RPi Wii cursor moving across the home screen
The cursor tracking algorithm utilizes CV to identify all the green contours in the frame based on the hue,
saturation, and value of each pixel. We initially only had one green LED that it would track, but adding a
second
LED allowed us to filter out more random contours the camera might see. The algorithm utilizes the BNO055’s
absolute orientation reading to determine the axis the LEDs should fall on, depending on how the player is
holding
their remote. It then goes through each green contour to find an area that is the correct distance apart to
determine the (x,y) center of the LEDs. This (x,y) data is sent from the remote to the Pi 4 console, which
inverts
the (x,y) across the center of the screen and renders the cursor at this position. This constituted our base
design, but it was significantly jittery and did not feel as smooth as we hoped.
Our first modification was switching out the LEDs to brighter LEDs we found on Amazon that had a 2000+ mcd light
intensity. We performed calibrations and testing to determine the best HSV values to filter for, and the
brighter
LEDs’ HSV values were much more constant, allowing us to tighten our range of green values. We also added a
smoothing algorithm that takes the average between the current and prior positioning, which improved the jittery
feel of the cursor. The distance between the LEDs was also calculated and tightened, and we added a feature to
discard any frames in which too many green contours are found to reduce latency. After these modifications, our
cursor tracking was much more accurate and smooth, giving it the same feel as a real Wii Remote.

Comparing the brighter new light (left) to the weaker old light (right)
Testing began by verifying LED movement across every section and corner of the camera perspective. We then
pointed
the camera away from the sensor bar to confirm that our calibration prevented it from picking up unintended
visuals. To evaluate noise resistance, we introduced green objects and ensured our filter algorithm correctly
isolated two green contours. Next, we checked cursor accuracy by confirming it targeted the inverse of the
received coordinates. Finally, we compared the original cursor to one with an averaged smoothing filter to
determine which provided the most natural response.
Software
On the software side, we used pygame to render the Wii’s graphics, updating the screen during each frame based
on
user input and state changes. We initially loaded the images with every single frame; however, since file reads
were a very expensive I/O operation, the performance of the console suffered significantly as the scale of the
applications increased. This issue was resolved by only loading images during each screen’s initialization. As
the
screen was updated each frame, pygame could access its objects’ class attributes to render the loaded images
without needing to make a file system call. In order to have a consistent framework, we developed a View class
for
all UI-related objects. The View class handled the lifecycle of each screen: reading user inputs, updating
states
and rendering the objects onto the screen. To create a new application, the object would only need to inherit
from
the View class and implement two functions; everything else would be taken care of by the parent class. This
abstraction allowed us to roll out games at a pace much quicker than expected, which was how we expanded beyond
the original scope of our project.

Main Menu of the RPi Wii which mimics the original Nintendo Wii Home Screen
We rigorously tested each View application and interacted with it throughout its lifecycle to confirm it behaved
correctly. We also played through each game and verified its functionality and visuals during each game state.
Finally, we navigated between menus, start screens, and applications to ensure smooth and accurate transitions
between View objects.
Results
Our team was able to meet our weekly goals easily and go far beyond
our original project scope. The original Wii Tennis implementation was expanded to Wii Sports, and then to the
entire Wii Console as a whole.

Initial design plan for just Wii Tennis, which we expanded into a full RPi Wii
Another feature that did not perform as planned was the Bluetooth communication. We had in mind that it would be a simple message queue back and forth. However, the Bluetooth communication acting as a stream posed significant issues and resulted in lots of hours of debugging. The cursor tracking also needed considerable refinement and had not been satisfactory initially, but we were able to properly tune and calibrate it for accurate cursor movement.
Despite these setbacks, our team was able to adapt quickly, refine our approaches, and ultimately deliver a system that far surpassed the original expectations.
Conclusion and Next Steps
Overall, our team was able to recreate the classic Wii console
system. Our original goal had been to implement Wii Tennis with the accelerometer readings only. We were able to
achieve this goal very quickly, and even upgraded to the 9-DOF IMU fusion sensor for an even more accurate game
of tennis. We then decided to incorporate the iconic cursor tracking feature of Nintendo’s Wii system, and from
there, we expanded our project into an entire Wii console. With cursor tracking capabilities, we were able to
significantly expand the software and features our Wii had. We implemented a Wii home screen, the Mii Channel,
and Wii Archery. Our Wii home screen featured the complete Wii User Interface, including an accurate time and
date display. We added fun easter eggs to the channels, and played videos for the channels that weren’t
implemented. We also added sound effects that were completely accurate to the Wii System. The Mii Channel
functioned identically to Nintendo’s original Mii Channel, with custom animations and assets identical to the
Mii Plaza. These additions transformed our initial concept into a fully functional and nostalgic recreation of
the original Wii experience, well beyond what we had initially set out to achieve.
Along the way, we incrementally made improvements to our hardware setup and discovered what worked and what did
not. Our original remote with just a triple-axis accelerometer could not have worked with our final system, and
did not have enough capabilities for more advanced features. The absolute orientation IMU fusion sensor worked
significantly better, and the switch allowed us to expand our system even further. The in-class LEDs were also
unsuccessful and would require far more advanced ML algorithms to be fully functional. Our cursor tracking was
able to achieve the smooth animation only due to the higher and more stable intensity from the new LEDs we
ordered. This project ultimately demonstrated that iterative development and thoughtful hardware choices can
turn a focused idea into a robust system with far more capabilities.
If we had more time to work on this project, we would have liked to add in further functionality for the other
channels beyond just playing a video. We were able to implement Wii Sports and the Mii Channel, however, the
home screen of Wii also contains channels like Weather, News, and more. It would be a cool addition for all
these features to work. More time would have also allowed us to further hone the existing games we had, such as
improving the Wii Archery with a vertical wind component and an updated shooting animation. Lastly, we would
replace the LED lights with infrared ones since the camera would likely pick up less noise.
Work Distribution
The work was fairly distributed amongst all three team members. Read below for more details on individual contributions.
Raspberry Pi Wii group picture

Natan Aklilu
nta6@cornell.edu
- Designed and implemented the full Wii interface including the Menu, Channel Screens, Songs, and Sounds
- Wii archery implementation using cursor data for aiming
- Accurate recreation of the Wii Sports menu screen

Young Zheng
yz486@cornell.edu
- Wii remote cursor detection using optical tracking of LED and absolute orientation data from a gyroscope
- Tennis implementation utilizing acceleration data from an IMU
- Assisted with soldering Pi components

Caitlien Le
chl72@cornell.edu
- Hardware specialist who assembled / soldered Pis and components
- Wii remote Bluetooth communication b/w Pis
- Mii Maker implementation with Create Your Mii and Mii Plaza screens that function similarly to the original game
Budget
Console Parts
- 1 x Raspberry Pi 4
- 1 x Raspberry Pi 4 Power Supply
- 1 x 16 GB MicroSD Card
- 1 x HDMI Cable
- 1 x Monitor
- 1 x Breadboard
- 2 x 3000 MCD Green LEDs: $9 total
- 2 x 65 Ω Resistors
- 1 x Speaker
Controller Parts
- 2 x Raspberry Pi Zero 2W
- 2 x 16GB MicroSD Card
- 2 x Breadboards
- 2 x Adafruit 9-DOF Absolute Orientation IMU Fusion Breakout (BNO055): $50 total
- 2 x Portable Batteries
- 1 x 4-Pin Button
- 1 x 2-Pin Button
- 1 x Raspberry Pi Camera v2.1
- 1 x Raspberry Pi Zero Camera Cable
Total: $59 + Loaned materials from lab
References
Code Appendix
All the code and media for this project are available on GitHub: https://github.coecis.cornell.edu/nta6/RPi-Wii-Sports.git. Here are some important code snippets, press each title to expand:
Menu class in main.py - Handles main menu initialization, rendering, and updates
class Menu(View):
    '''
    Home menu class that ties in GameSquare, StartButton, and each application
    '''
    def __init__(self, screen, client_socket1, server_socket):
        super().__init__()
        self._screen = screen
        self._client_socket1 = client_socket1
        self._server_socket = server_socket
        self._x, self._y = 0, 0 # cursor
        self._selected = False
        self._selected_square = None
        self._squares = []
        self.make_squares()
        # Load home, channel, and mouse images into menu object
        home = pygame.image.load("images/wii_home_screen.png").convert_alpha()
        home = pygame.transform.scale(home, (WIDTH, HEIGHT))
        home_rect = home.get_rect(center=(WIDTH // 2, HEIGHT // 2))
        self._home = (home, home_rect)

        channel = pygame.image.load("images/wii_channel_screen.png").convert_alpha()
        channel = pygame.transform.scale(channel, (WIDTH, HEIGHT))
        channel_rect = channel.get_rect(center=(WIDTH // 2, HEIGHT // 2))
        self._channel = (channel, channel_rect)

        mouse = pygame.image.load('images/mouse.png').convert_alpha()
        self._mouse = pygame.transform.scale(mouse, (50, 50))

        # Start home screen music
        play_music()

    # handles player cursor
    def handle_events(self):
        '''
        Handles player cursor
        - NOTE: Local testing is currently commented out, switch back if needed
        '''
        # handle cursor
        p1_message = self._client_socket1.recv(1024).decode('utf-8')
        if not p1_message:
            return

        _, (x, y), click, quit, _ = process_message(p1_message)
        self._x, self._y = (self._x + x) // 2 , (self._y + y) // 2
        self._running = not quit

        # handle quit
        super().handle_events(quit)

        if self._selected:
            # Setting rects for "Wii Home" and "Start" buttons
            home_button_rect = pygame.Rect(0, 0, 440, 120)
            home_button_rect.center = (387, 629)

            if click and home_button_rect.collidepoint(self._x, self._y):
                # Return to main menu if home button is clicked
                pygame.mixer.music.stop()
                play_sound("media/wii_click_sound.wav")
                print("Home button pressed")
                # Updating state to return to main menu
                self._selected = False
                self._selected_square = None
                play_sound("media/wii_channel_exit.wav")
                # Call function to fade from channel to home screen
                self.fade_to_home()

            start_button_rect = pygame.Rect(0, 0, 440, 120)
            start_button_rect.center = (898, 629)

            if click and start_button_rect.collidepoint(self._x, self._y):
                # Start selected channel's app if start button is clicked
                print(f"Start button pressed for {self._selected_square.title}")
                self.fade_to_start()
        else:
            for square in self._squares:
                if square.is_start_clicked(click, self._x, self._y):
                    # Playing click noise when button is clicked
                    pygame.mixer.music.stop()
                    play_sound("media/wii_click_sound.wav")
                    print(f"Starting {square.title}...")
                    # Updating state to enter channel screen
                    self._selected = True
                    self._selected_square = square
                    play_sound("media/wii_channel_enter.wav")
                    # Call function to fade from home to channel screen
                    self.fade_to_channel()

    def render(self):
        '''
        Renders the home menu and player cursor
        - Handles both cases of main menu and selected square
        '''
        # start with blank screen
        self._screen.fill(WHITE)

        if self._selected:
            self.draw_selected()
        else:
            self.draw_menu()

        # render mouse
        self._screen.blit(self._mouse, (self._x - 25, self._y - 25))

    def draw_menu(self):
        '''
        Helper function to draw the main wii home menu
        '''
        # Draw wii home background
        self._screen.blit(self._home[0], self._home[1])

        # Draw local time on wii menu (Mon 5/5)
        local_time = time.localtime()
        # Extract components
        day_abbr = time.strftime("%a", local_time)
        month = str(local_time.tm_mon)
        day = str(local_time.tm_mday)
        formatted_date = f"{day_abbr} {month}/{day}"
        # Draw on screen
        date_surf = date_font.render(formatted_date, True, DARK_GRAY)
        date_rect = date_surf.get_rect(center=(WIDTH // 2, HEIGHT - 50))
        self._screen.blit(date_surf, date_rect)

        time_surf = time_font.render(time.strftime("%H:%M"), True, GRAY)
        time_rect = time_surf.get_rect(center=(WIDTH // 2, HEIGHT - 130))
        self._screen.blit(time_surf, time_rect)

        for square in self._squares:
            # Draw each box
            square.draw(self._screen, (self._x, self._y))

    def draw_selected(self):
        '''
        Helper function to draw the selected channel screen
        '''
        # Draw wii channel background
        self._screen.blit(self._channel[0], self._channel[1])

        # Draw selected channel picture (1280 X 560)
        self._screen.blit(self._selected_square.large_img[0], self._selected_square.large_img[1])
player_one_remote.py - Handles P1 remote messages and sends processed data to the "console" (RPi 4)
import bluetooth
import time
import board
import digitalio
import adafruit_bno055
from picamera2 import Picamera2
import cv2
import numpy as np
from math import hypot
import RPi.GPIO as GPIO
import math

def compensate_tilt(px, py, angle_deg):
    angle_rad = -math.radians(angle_deg)
    cx, cy = 640, 360
    dx, dy = px - cx, py - cy
    x_rot = dx * math.cos(angle_rad) - dy * math.sin(angle_rad)
    y_rot = dx * math.sin(angle_rad) + dy * math.cos(angle_rad)
    return (x_rot + cx, y_rot + cy)

# Button Setup
GPIO.setmode(GPIO.BCM)
GPIO.setup(26, GPIO.IN, pull_up_down=GPIO.PUD_UP)
GPIO.setup(13, GPIO.IN, pull_up_down=GPIO.PUD_UP)

# Camera Setup
picam2 = Picamera2()
video_config = picam2.create_video_configuration()
picam2.configure(video_config)
picam2.start()

lower_green   = np.array([35, 240, 240])
upper_green   = np.array([65, 255, 255])
prev_x, prev_y = 1280, 720
prev_invalid   = False
time.sleep(5)

# Bluetooth and IMU Setup
wii_remote    = adafruit_bno055.BNO055_I2C(board.I2C())
server_address = "D8:3A:DD:4D:D2:06"  # MAC address for pi 4

# Wait to connect to console
while True:
    try:
        client_socket = bluetooth.BluetoothSocket(bluetooth.RFCOMM)
        client_socket.connect((server_address, 1))
        print("Connected.")
        break
    except:
        print("Waiting...")
        time.sleep(2)

# Sending data loop
while True:
    try:
        # Get (x,y) position of LED from camera
        frame     = picam2.capture_array()
        hsv       = cv2.cvtColor(frame, cv2.COLOR_BGR2HSV)
        mask      = cv2.inRange(hsv, lower_green, upper_green)
        result    = cv2.bitwise_and(frame, frame, mask=mask)
        contours, _ = cv2.findContours(mask, cv2.RETR_TREE, cv2.CHAIN_APPROX_SIMPLE)
        prev_contours = []

        # Read orientation
        pitch, roll, yaw = wii_remote.euler

        # Get angular velocity
        _, _, v_z = wii_remote.gyro

        # Read buttons
        click     = 1 if GPIO.input(13) == GPIO.LOW else 0
        quit_flag = 1 if GPIO.input(26) == GPIO.LOW else 0

        # Send data
        message = f"*{pitch} {roll} {yaw},{prev_x} {prev_y},{click},{quit_flag},{v_z}\n"
        if pitch is not None and prev_x is not None and v_z is not None:
            client_socket.send(message)

        if len(contours) > 40 or yaw == None: # 10
            continue

        for cnt in contours:
            x0, y0, w, h = cv2.boundingRect(cnt)
            x1, y1      = compensate_tilt(x0 + w//2, y0 + h//2, yaw)

            for x2, y2 in prev_contours:
                if abs(y1 - y2) >= 50 or not (50 < abs(x1 - x2) < 400): # same, 100, 700
                    continue
                new_x, new_y = (x1 + x2)//2, (y1 + y2)//2
                dist = hypot(prev_x - new_x, prev_y - new_y)

                prev_x, prev_y = new_x, new_y
            prev_contours.append((x1, y1))

    except bluetooth.btcommon.BluetoothError as error:
        print(error)
        break

picam2.stop()
client_socket.close()
GPIO.cleanup()
utils.py - Important functions that process incoming remote messages and play external media
from constants import SCREEN_DIMENSIONS, VOLUME, BLACK
import pygame
import subprocess

# process messages from controllers
def process_message(s):
    width, height = SCREEN_DIMENSIONS
    start = s.index('*') + 1
    end = s.index('\n', start)
    s = s[start: end].split('\n')[0]
    orientation_str, cursor_str, click_str, quit_str, speed = s.split(',')

    orientation_vals = [float(val) for val in orientation_str.split(' ')]
    cursor_vals = [float(val) for val in cursor_str.split(' ')]
    click_val = int(click_str)
    quit_val = int(quit_str)
    speed_val = float(speed)

    flipped_cursor = (width - cursor_vals[0], height - cursor_vals[1])

    return tuple(orientation_vals), flipped_cursor, click_val, quit_val, speed_val


def play_sound(sound_path):
    '''
    Helper function to play sound using pygame.mixer.Sound
    '''
    sound = pygame.mixer.Sound(sound_path)
    sound.set_volume(VOLUME)
    sound.play()

def play_music(track_path="media/wii_menu_music.mp3"):
    '''
    Helper function to play music using pygame.mixer.music
    - Defaults to home menu music
    '''
    pygame.mixer.music.stop()
    pygame.mixer.music.load(track_path)
    pygame.mixer.music.set_volume(VOLUME)
    pygame.mixer.music.play(-1)

def play_video(screen, video_path):
    '''
    Helper function to play videos using mplayer
    '''
    # Turn off music while app runs
    pygame.mixer.music.set_volume(0)
    screen.fill(BLACK)
    pygame.display.update()

    # May have to use -vo flag to get video on monitor instead of RPi
    subprocess.run(["mplayer", "-fs",video_path])
    # Turn music back on
    pygame.mixer.music.set_volume(VOLUME)